
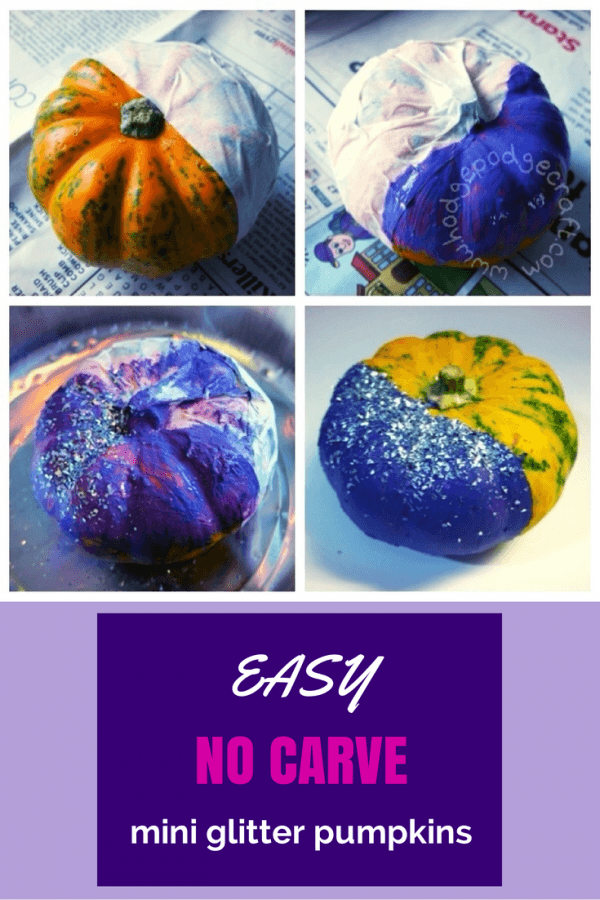
How to make gorgeous mini glitter pumpkins (easy enough for a toddler to do)!
These mini glitter pumpkins make great table centres for Halloween or Thanksgiving!
Having 2 boys under 3 means I am chief pumpkin carver in our house. They can’t be trusted with knives (obviously!) and while they could help with the scooping out of seeds and innards, Pickle isn’t too keen on getting slimy and Chops isn’t keen on doing anything that Pickle doesn’t want to do! They were, however, very excited to decorate pumpkins and Grandad bought them these adorable mini pumpkins, so we decided to do something special with them – mini glitter pumpkins – easy enough for an 18 month old to make (with almost no help)!
To make mini glitter pumpkins, you will need:
- mini pumpkins (we used munchkins – cute name, huh?)
- masking tape (optional)
- paint (we used acrylic)
- glitter (in shakers for the little ones!)
COST: a few quid
AGE: toddlers up
TIME: 10 minutes, plus drying time
How-to make mini glitter pumpkins:
- Cover all surfaces with newspaper and children with old shirts/smocks.
- Use masking tape to cover some of (about 1/2) your munchkin. You don’t have to do this, but I liked the way that our finished munchkins retained some of their natural beauty.
- Let your little ones loose with the paint – the thicker and gloopier the paint layer the better. Older (more patient!) kids could let theirs dry before adding a 2nd coat, or masking off another section and using a different colour.
- Sprinkle on a liberal amount of glitter (which will stick to the paint). We put our munchkins into trays before this step, in order to catch any stray glitter. Chops loved this bit best – we had to wrestle the glitter away from him, even after he’d unscrewed the lid and dumped it everywhere!
For a more professional and durable finish (perhaps if you were making these as a centre-piece for an Autumn wedding), you could paint a couple of layers, allowing each to dry, then use Mod Podge to stick on the glitter. - Allow to dry completely (overnight is best)
- Peel off masking tape and admire your sparkly munchkins! Easy, right?
https://www.instagram.com/p/gERBTXGekW/
If you want to carve your pumpkin instead of painting it, check out for my top 10 pumpkin carving tips to make it easy for yourself and help your finished pumpkin to last longer…


Pingback: Kids Halloween Party | Style My Party
Pingback: Hodge Podge Craft » Happy Halloween!
Hey there, just found your blog through your PingBacks on lofting ooh! SO glad I did! I love how you used a pot for the glitter pumpkins here! I will HAVE to use that top. I also love how you included the children as well! Look forward to many more great posts from you. PS the font and page theme you chose is wonderful
What a lovely comment, thank you Jeanine, you have made my day! 😀
Just followed you via Bloglovin – great to have discovered your blog too.
P.S. The font is my handwriting(!) and MisterPodge helped me design the page theme – I’m very glad of my resident geek 😉
Love glitter! They are so pretty! #pintorials
Thanks Eileen! x
We will be trying this out! Is acrylic paint expensive? Most of my little girls paint doesn’t seem to adhere well to other surfaces (except the carpet)so I assume it’s most definately not acrylic!:) xx
I found some large tubes of bright acrylic paint in The Works last week for £2-£3 each, which I thought was very reasonable. Do you have a ‘The Works’ near you Adele?
Hi, I do thank you! I had a quick look in the pound shop the other week and found a couple of colours in there but will check out the works too to see what they’ve got xx
Great news! Enjoy your crafting 🙂
Pingback: 10 awesome pumpkin carving tips
This is a fantastic craft for little hands. Thank you so much for this fast, and child friendly activity. Thanks for the post!
Thanks Deborah! 🙂