
A waistcoat for Nonno bear (a Build-a-Bear pattern)
A special gift for a very special bear.
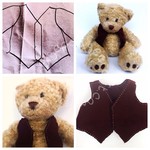
Simple Build-A-Bear waistcoat pattern and how-to.
Pickle has a very special friend. Nonno bear was a gift from Grandad for his 1st Christmas and has been Pickle’s bedtime companion and comforter ever since. Nonno bear is very well loved. So well loved in fact that his nose has started to unravel and some of the stuffing is coming out (he has already been sent to the US for a nose job, but I think I will have to give him another one soon)!*
https://www.instagram.com/p/bFCrOKmepT/
I wanted to make something special for Nonno bear, so I decided to design a simple waistcoat pattern. You can download it for free here: Build-A-Bear Waistcoat Pattern.
You will need:
– fabric scraps (I used fabric from a second-hand blazer, but wish I had used felt instead)
– a sharp pair of scissors
– needle and thread
– paper and pins
COST: under £5
AGE: 8+ (with help!)
TIME: 2 hours (longer if you are not using felt and need to hem the fabric!)
https://www.instagram.com/p/bFCyyEmepf/
How-to:
- Print out the pattern (link above) on A3 paper at 100%
- Cut out all 3 pieces. If you are using felt (which I would highly recommend, especially for kids or a first sewing project), then you won’t need to hem the fabric and you can cut along the black outline. If you are using another fabric, cut along the blue outline.
- Pin your pieces to the fabric and carefully cut around the paper templates.
- If using felt, move on to step 6 now. If using another fabric, cut along the blue dotted lines, through both the paper and the fabric. This will make it easier to hem your curved fabric edges.
- Cut along the black lines, through the paper only, removing the blue outlined pieces of paper, then fold and pin the extra fabric to match the shape of the black outline and sew along these edges, sealing the hem. You can leave the side and top edges (where the fabric will meet) un-hemmed, as they will be sealed (and hidden) in the next step.
- Remove the paper. Place the ‘good’ edges of the fabric (i.e. the sides that will be seen) together, then pin and sew the sides and the shoulders together.
- Turn right-side out and you’re done! I added an outline of white stitching to Nonno bear’s waistcoat, but you could also add buttons or a little faux pocket and hankie (depending on your confidence/sewing ability!)…
Once I’d finished Nonno bear’s gift, I wrapped it ready for Pickle to give to him (and help him open) after nap time. It was definitely worth the effort!
https://www.instagram.com/p/bFC4UdGepx/
Does your little one have a special bear or doll? Would you make them a gift?
*Note: I used our emergency stunt double/model Nonno bear for the photos in the hero shot above, but the photos of Pickle opening and presenting the waistcoat feature his real and very worn out Nonno bear!


!")


Pingback: Hodge Podge Craft » Washi tape wristband: festival ID for kids
Pingback: Hodge Podge Craft » Craft ideas for kids: How to make a feather headdress
I would like to print out the vest pattern but I don’t have the ability to print A3 paper. Can you tell me how to print on letter size paper 8 1/2 inches by 11 inches?